How to Improve 3D Print Layer Adhesion (Stronger Parts)
Layer adhesion is the bond between stacked layers — almost always the weakest direction of a print. Here's how to make it stronger, from free setting changes to how you orient the part.
Try these in order (cheapest first)
- Raise the nozzle temperature toward the top of the filament's range — Free
- Turn the part-cooling fan down (or off for ABS, ASA, nylon) — Free
- Dry the filament before printing anything load-bearing — Free–$50
- Widen the extrusion and lower the layer height for more weld area — Free
- Orient the part so load runs along the layers, not across them — Free
- Add walls instead of infill — and anneal PLA for extra strength — Free
Step by step
Step 1: Print hotter — it's the biggest single lever
Layers bond by re-melting the surface of the one below so the two flow together. The hotter the plastic, the deeper that re-melt and the stronger the weld. For strength, run near the top of your filament's printed temperature range rather than the middle — the prettiest surface temperature and the strongest bonding temperature aren't the same number. Print a temperature tower (one model that steps through a range of temps), then snap each block by hand; the lowest temperature that won't break cleanly along a layer is your strength setting. A 10°C bump is often the difference between a part that survives and one that peels.
Step 2: Turn the part-cooling fan down
The part-cooling fan is the enemy of layer strength. It freezes the surface of each layer before the next one can melt into it, leaving a shallow, weak join. PLA tolerates a lot of fan because it bonds at low temperatures, but for strong functional parts, drop it to 30–50% even on PLA. For ABS, ASA, polycarbonate, and nylon, run almost no fan after the first few layers — those materials need the heat to stay in. Keep just enough airflow for clean overhangs and bridges; everything beyond that is trading strength for cosmetics.
Step 3: Dry the filament before anything load-bearing
Wet filament cannot weld cleanly no matter how hot you print. Moisture absorbed from the air flashes to steam at the nozzle, leaving microscopic voids and a foamy extrusion that bonds poorly to the layer below. The result looks rough and snaps along the layers under almost no load. Nylon, PETG, PC, and TPU drink water fastest; PLA and ABS are slower but not immune after weeks open. If a spool has been sitting out, dry it in a filament dryer or low oven before you print a part that has to hold — it's the most overlooked cause of weak layers.
Step 4: Widen the extrusion and lower the layer height
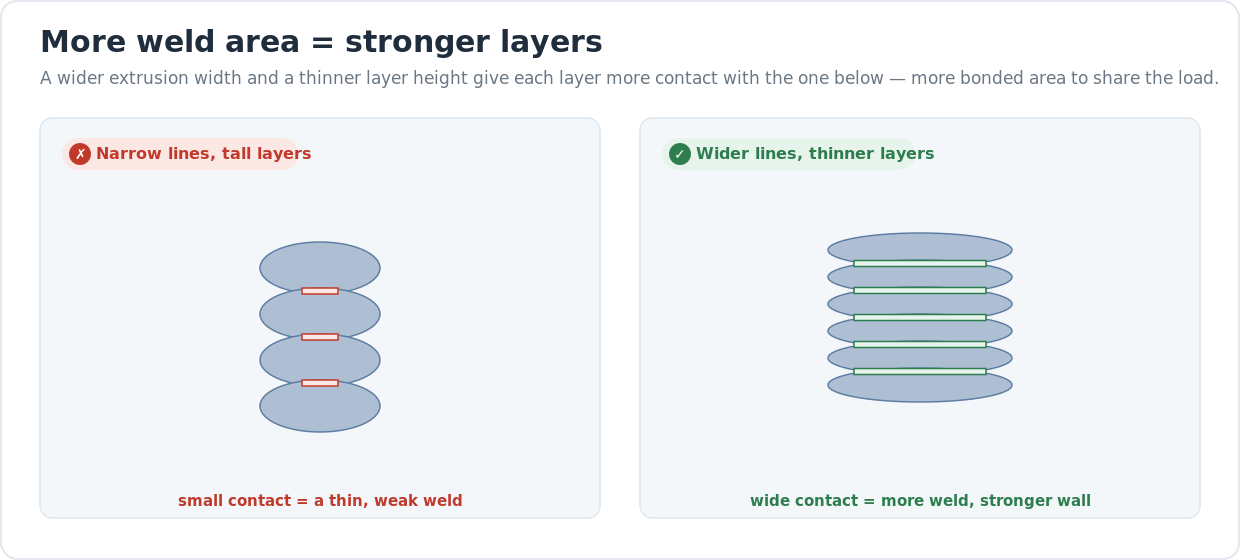
More contact between layers means more bonded area to carry load. Two free slicer changes add weld area: set the extrusion width to 110–120% of your nozzle diameter so each line lays down a fatter, more overlapping bead, and drop the layer height to 75% of the nozzle diameter or less (0.2mm or under on a 0.4mm nozzle) so each layer presses harder into the last. Thinner layers also mean more welds per millimetre of height. Both cost print time, not money, and noticeably stiffen a wall against splitting.
Step 5: Orient the part so load runs along the layers
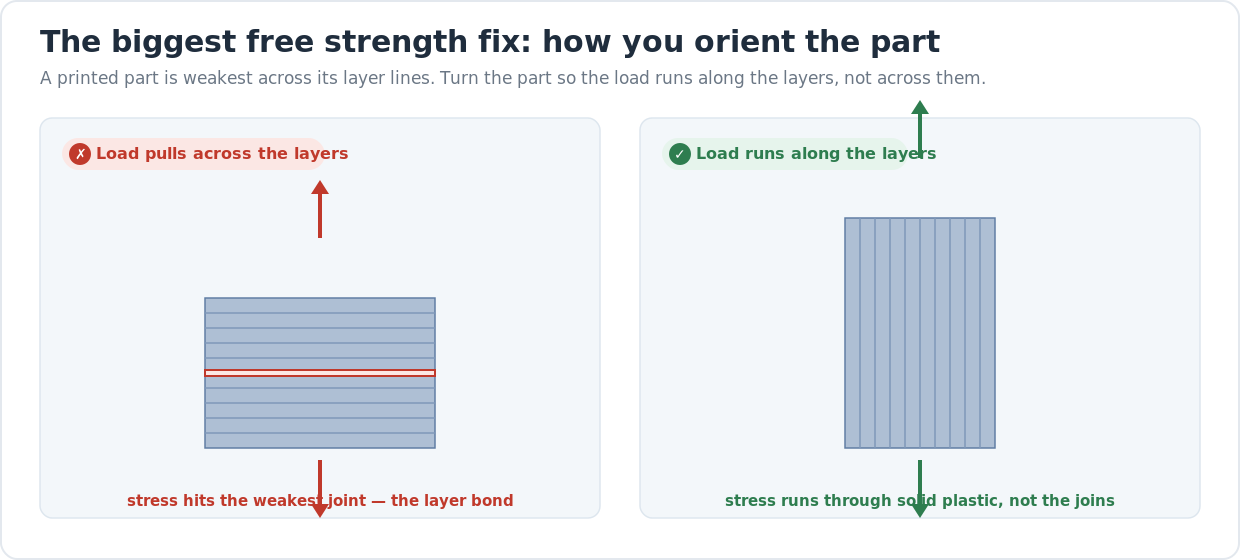
This is the biggest free gain and the one most people miss. A printed part is always weakest across its layer lines, because that's where the welds are. Before you print a functional part, think about which way it will be pushed, pulled, or bent in use, and rotate it in the slicer so that force runs along the layers — through solid plastic — instead of trying to peel them apart. A hook that hangs a weight, a bracket that takes a bending load, a clip that flexes: each wants its layers running with the stress, not across it. Sometimes the strong orientation needs more support material; for a part that has to survive, that trade is worth it.
Step 6: Add walls instead of infill, and anneal PLA
For a stronger part, add perimeters before you add infill. Going from two walls to four does far more for real-world strength than cranking infill from 20% to 60%, because the solid outer shell carries most of the load and uses less plastic and time doing it. Three or four walls is the sweet spot for functional parts. If you need still more from PLA specifically, annealing — baking the finished part at a low temperature so the polymer re-crystallises — can boost strength and heat resistance, at the cost of a little shrinkage and distortion you have to design around. Test it on a sacrificial copy first.
Frequently asked questions
- What is the difference between layer adhesion and bed adhesion?
- Bed adhesion is whether the first layer sticks to the build plate; layer adhesion is whether the stacked layers bond to each other up the height of the print. They're separate problems with separate fixes. If your first layer won't stick, that's a bed-adhesion and leveling issue. If the print builds fine but snaps or peels along the layer lines under load, that's layer adhesion — the subject of this guide.
- Does higher temperature always mean stronger layers?
- Up to a point, yes — hotter plastic re-melts the layer below more deeply and welds stronger. But too hot causes stringing, oozing, and heat creep that clogs the nozzle, and every filament has a ceiling printed on the spool. The right move is to run near the top of that range, not above it, and confirm with a temperature tower. Strength climbs with heat until print quality and reliability start to fall apart.
- Do more walls or more infill make a print stronger?
- More walls, in most cases. The solid outer perimeters carry the bulk of the load, so going from two walls to four typically adds more real strength than raising infill from 20% to 60% — and it uses less plastic and time. Use three or four walls for functional parts and keep infill moderate. Infill mainly resists crushing and supports the top surface; the shell does the structural work.
- Why does my print snap along the layer lines so easily?
- Because that's the weakest direction of any FDM print, and something is making the bond weaker still — usually a temperature too low, too much part cooling, or wet filament. Fix those first, then check orientation — if the part is loaded across its layers, even a perfect weld may not be enough, and you need to rotate it so the stress runs along the layers instead. If it's visibly cracking as it prints, see our cracking guide for diagnosis.
- Can print orientation really matter more than settings?
- Often, yes. A part loaded across its layer lines fails at the welds no matter how well you tune temperature and cooling, while the same part oriented so the load runs along the layers can be several times stronger with no setting change at all. Always decide how a functional part will be stressed in use and orient it so that force passes through solid plastic, not across the layer bonds. It's the cheapest strength upgrade there is.
Every print is weakest across its layers
An FDM print is not solid plastic — it’s a stack of welded lines, and the welds between layers are the weakest part of it. Pull a part apart and it almost always splits along a layer line, because that’s where one bead of plastic had to fuse to the one below while both were cooling. Improving layer adhesion means making those welds as strong as you can, and then arranging the part so the load doesn’t attack them in the first place.
The hero diagram captures the whole idea. The same bar, printed the same way, is weak when the load pulls across its layers and strong when the load runs along them. That’s why this guide leads with free changes — temperature, cooling, drying, extrusion, and orientation — and never needs you to buy anything. Work the list in order and change one thing at a time so you know what actually helped.
More weld area, more strength
After temperature, the next free lever is contact area. A wider extrusion width lays a fatter bead that overlaps its neighbour more; a thinner layer height presses each layer harder into the last and packs more welds into the same height. Both give the wall more bonded area to share a load, and both cost only print time. Pair them with three or four perimeters instead of high infill and you get a part that’s stiff where it counts.
When the layers are actively splitting
This guide is about improving adhesion on a print that builds fine but isn’t strong enough. If your layers are visibly cracking and pulling apart while the print is still on the bed — especially with ABS or ASA — that’s a diagnosis problem, not an optimisation one. Our guide to why prints crack and split along the layers walks through that failure in order, and most of its fixes (hotter, less cooling, dry filament, no drafts) are the same foundations as here.
A weak, foamy extrusion that bonds poorly is also a classic sign of moisture, so if your prints feel brittle and look rough, read how to dry filament before blaming your settings — and if the surface is gappy and the walls feel thin, under-extrusion may be starving the weld of plastic.
Material sets the ceiling
No amount of tuning makes a weak material strong. PLA is stiff but brittle and softens in heat; PETG is tougher and more flexible; ABS and ASA trade some strength for heat resistance and need an enclosure to bond well. If you’re choosing what to print a load-bearing part in, our PLA vs PETG vs ABS comparison breaks down which plastic suits which job — picking the right material is the strength decision you make before any slicer setting.
Last updated
Reviewed 2026-06-30. The temperature, extrusion-width, and layer-height figures above are typical starting points for common FDM machines and filaments — your spool’s printed range and your printer’s documentation win if they disagree. Annealing behaviour varies a lot by brand and part geometry; always test it on a spare copy before committing a part you care about.