How to Dry Filament: Fix Moisture Problems the Right Way
Wet filament makes popping sounds, produces rough surfaces, and weakens layer bonds. Here's how to identify it, dry it, and keep it dry.
Try these in order (cheapest first)
- Identify wet filament by symptom (popping, rough surface, stringing, weak layers) — free
- Dry filament in a food dehydrator or low oven at the right temp for 4–8 hrs — $35–$80 dehydrator / $0 if oven
- Store dried filament in sealed bags or airtight bins with fresh silica gel — $10–$25 one-time
- Print directly from a dry box for humidity-sensitive materials (PETG, nylon, TPU) — $15–$40 dry box
Step by step
Step 1: Identify wet filament by its symptoms
Wet filament gives itself away during printing. The clearest sign is **popping or crackling sounds** from the nozzle — that's moisture vaporising as steam. Other symptoms: rough or bubbly surface finish on otherwise well-tuned prints; unexpected stringing between features even with good retraction settings; layer adhesion that's noticeably weaker than usual (layers delaminate under finger pressure); and for materials like nylon or PETG, a dull, rough surface texture instead of the expected slight sheen. Any one of these symptoms could have another cause, but if you're hearing pops you almost certainly have moisture. A quick 4-hour dry is cheap enough to rule it out before chasing other settings.
Step 2: Dry filament in a food dehydrator (best method)
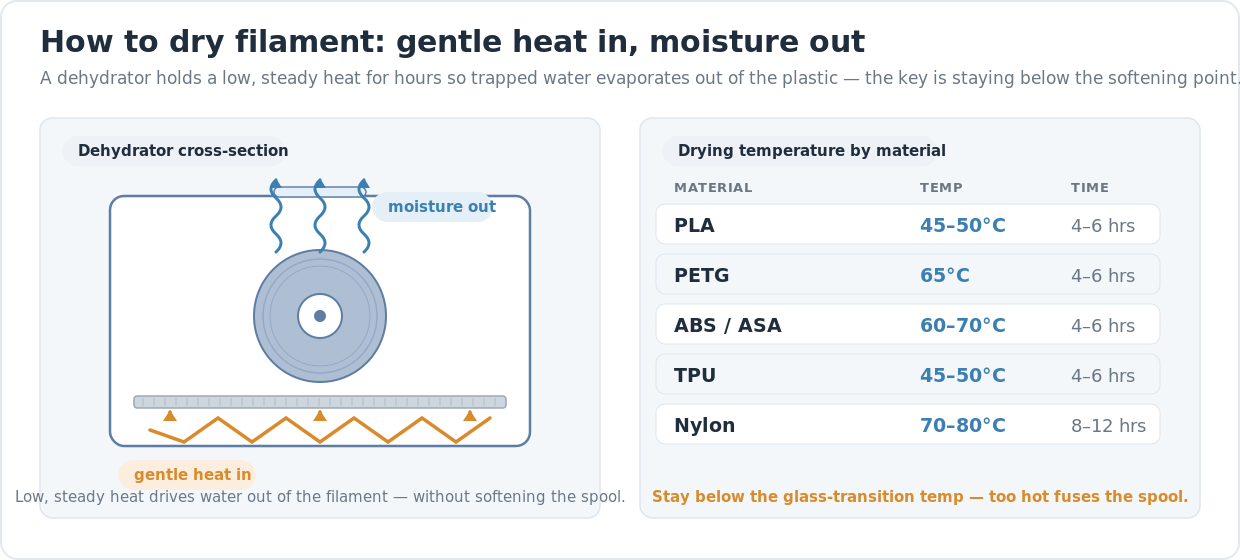
A food dehydrator is the best tool for drying filament: it holds a consistent low temperature for hours, has a gentle fan for even drying, and you set-and-forget it. Load the spool onto the dehydrator rack (many spools need the inner wall removed to sit flat; remove it or use a bespoke spool holder) and dry at the appropriate temperature for your material. The key constraint is staying below the glass-transition temperature so the filament doesn't soften and fuse on the spool. **PLA:** 45–50°C for 4–6 hrs. **PETG:** 65°C for 4–6 hrs. **ABS/ASA:** 60–70°C for 4–6 hrs. **TPU:** 45–50°C for 4–6 hrs. **Nylon:** 70–80°C for 8–12 hrs (nylon absorbs heavily and needs longer). Most low-cost dehydrators run 35–70°C — check your machine's actual temperature with a thermometer, since the dial can be inaccurate by ±5–10°C.
Step 3: Dry filament in an oven if you don't have a dehydrator
A household oven works, but it requires more care. Most ovens have poor temperature accuracy at low settings and no fan circulation at low power — this can create hot spots. Use an oven thermometer to verify the actual temperature before loading filament. Set the oven to its lowest setting (often 170–200°F / 77–93°C on older ovens), check with a thermometer, and adjust. If your oven can't reliably hold below 65°C for PLA, it will warp the spool. **Safer oven approach:** heat to 150–170°F (65–77°C), turn off the oven, load the filament, and let it coast down — this avoids the hottest phase. Nylon is more forgiving (needs 70–80°C) and is easier to oven-dry safely. Keep the oven door cracked open a few millimetres with a wooden spoon to let moisture escape; a sealed oven traps the steam you're trying to remove.
Step 4: Store dried filament to keep it dry
Drying is pointless if you put the filament back in humid air. For storage: resealable vacuum bags (squeeze out the air) with a fresh packet of silica gel desiccant per spool work well and take up minimal space. Airtight storage bins (the kind sold for pet food or cereal) hold multiple spools and are easier to access. **Silica gel:** use indicating beads (blue or orange when dry, colour-shifts when saturated); recharge them in the oven at 120°C / 250°F for 30 minutes when they change colour. The amount of desiccant matters: roughly 100–150g per sealed bin, more for larger containers or humid climates. Store in a cool, dry place — a shelf in a climate-controlled room is fine; an unheated garage in a humid summer is not.
Step 5: Print from a dry box for moisture-sensitive materials
For PETG, nylon, and TPU — materials that absorb moisture fast enough to degrade mid-print — storing dry isn't always enough. A **dry box** feeds the filament directly from a sealed, desiccated container through a PTFE tube into the extruder, so the filament never sits open in humid air while printing. A simple dry box is an airtight bin with a hole for the tube and fresh silica gel inside — functional for under $20 in parts. Commercial versions add a humidity display and a built-in spool holder. You don't need a dry box for PLA, ABS, or ASA unless you live in an unusually humid climate; you likely do need one if you print nylon regularly or if your PETG consistently gives you stringing even after a thorough dry.
Frequently asked questions
- How do I know if my filament is wet?
- The clearest sign is popping or crackling sounds from the nozzle while printing — that's steam. Other signs are rough or bubbly surface finish, unexpected stringing, and weak layer adhesion on prints that used to come out well. Any of these on otherwise well-tuned settings is worth a quick dry run to rule out moisture before changing other settings.
- Can I dry filament in a regular oven?
- Yes, but with care — most household ovens are inaccurate at low settings and can have hot spots that reach temperatures which warp the spool. Use an oven thermometer to verify actual temperature. For PLA, which softens at ~60°C, oven-drying is risky unless you can confirm the oven holds below that. For nylon and PETG, ovens are more practical since both tolerate 65–80°C. A food dehydrator is safer and easier for frequent use.
- How long does it take to dry filament?
- For PLA, PETG, ABS, and TPU — 4–6 hours at the right temperature handles normal moisture pickup. For nylon, which absorbs moisture more aggressively, 8–12 hours is more reliable. If you've been storing spools open in a humid space for months, add a few extra hours. A faint steam smell while drying is normal; when it stops, most of the moisture is gone.
- Does drying filament affect print settings?
- Slightly. Dry filament often needs a touch more retraction (it flows slightly differently without the steam lubricating the melt) and may accept slightly higher temperatures for better layer bonding. But the changes are small — mostly you'll notice the prints just looking and sounding right again rather than needing major profile adjustments.
- How long does filament stay dry after drying?
- Depends on humidity and material. PLA in a low-humidity room can sit open for several days before it picks up meaningful moisture. PETG and TPU pick up moisture noticeably in 12–24 hours in high humidity. Nylon can degrade in a few hours on the spool in a humid room. Best practice is to dry just before printing and seal the rest immediately after.
Is wet filament actually your problem?
Before spending 4 hours drying, confirm it’s worth it. The one reliable tell is sound: if you hear popping, crackling, or hissing from the nozzle that isn’t there when the filament is fresh, you have moisture. Surface defects and stringing alone could be caused by temperature, speed, or retraction settings — but the acoustic signature of steam in the melt is hard to fake.
When in doubt, do a quick dry anyway. A 4-hour dehydrator run is low effort. If print quality improves immediately on the first run post-dry, moisture was the culprit and you’ve solved it. If nothing changes, you know it’s a settings issue and you can chase that instead.
Temperature and time reference
| Material | Drying temp | Time |
|---|---|---|
| PLA | 45–50°C | 4–6 hrs |
| PLA+ | 45–50°C | 4–6 hrs |
| PETG | 65°C | 4–6 hrs |
| ABS / ASA | 60–70°C | 4–6 hrs |
| TPU | 45–50°C | 4–6 hrs |
| Nylon | 70–80°C | 8–12 hrs |
Stay below the material’s glass-transition temperature — softening on the spool means the layers can fuse and the spool becomes unusable. When in doubt, run cooler and longer rather than hotter and faster.
The full filament picture
Moisture is one of the main reasons prints degrade over time — but it’s not the only one. If your prints still look off after drying, check whether the filament itself is the right material for the job. For outdoor parts that always seem to fail, see which filament holds up in the sun. For a side-by-side of the main desktop materials, see PLA vs PETG vs ABS — which filament should you use?.
If the surface problems look more like a first-layer or adhesion issue rather than a moisture issue, the fix first-layer adhesion problems guide covers the ordered set of fixes. And if you’re just getting into 3D printing and still deciding on a machine, the honest desktop 3D printer buyer’s guide covers which printers handle filament best.
Last updated
Reviewed 2026-06-24. Temperature and time figures are practical ranges from manufacturer data sheets and community reference; always verify against your specific filament brand’s technical guidelines.