3D Print Not Sticking to the Bed? Fix It in Order
The real fixes for first-layer adhesion, cheapest-first. Most failures are solved before you spend a cent.
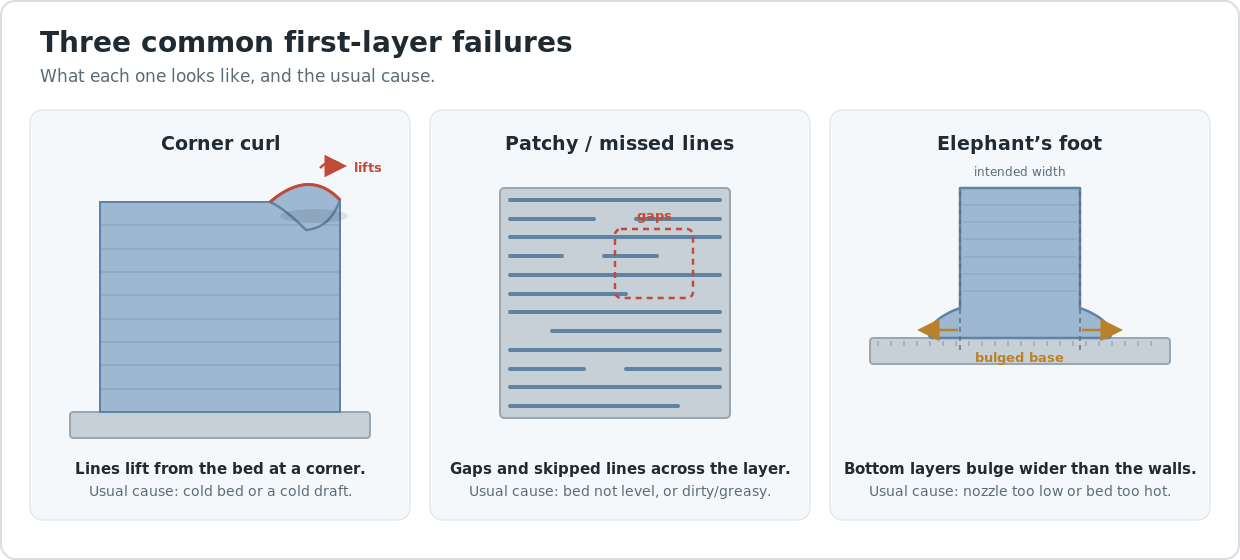
Try these in order (cheapest first)
- Clean the bed with isopropyl alcohol — Free–$8
- Lower the nozzle (set a correct Z-offset / live-tune the first layer) — Free
- Re-level the bed (or run auto bed leveling) — Free
- Raise bed temperature 5–10°C — Free
- Slow the first layer to 20–25 mm/s — Free
- Add adhesion help — glue stick, PEI sheet, or a brim — $0–$25
Step by step
Step 1: Clean the bed — this fixes more failures than anything else
Skin oil and old fingerprints are the number-one cause of poor adhesion, and almost everyone skips this. Wipe the build plate with 90%+ isopropyl alcohol and a paper towel before every print session — not just the print area, the whole sheet, since you touch it when you remove parts. For textured PEI, a wash with warm water and a drop of dish soap once a week strips the oil buildup that alcohol alone leaves behind. Let it dry fully. Never touch the clean surface with bare fingers afterward.
Step 2: Set the Z-offset so the first layer is squished, not floating
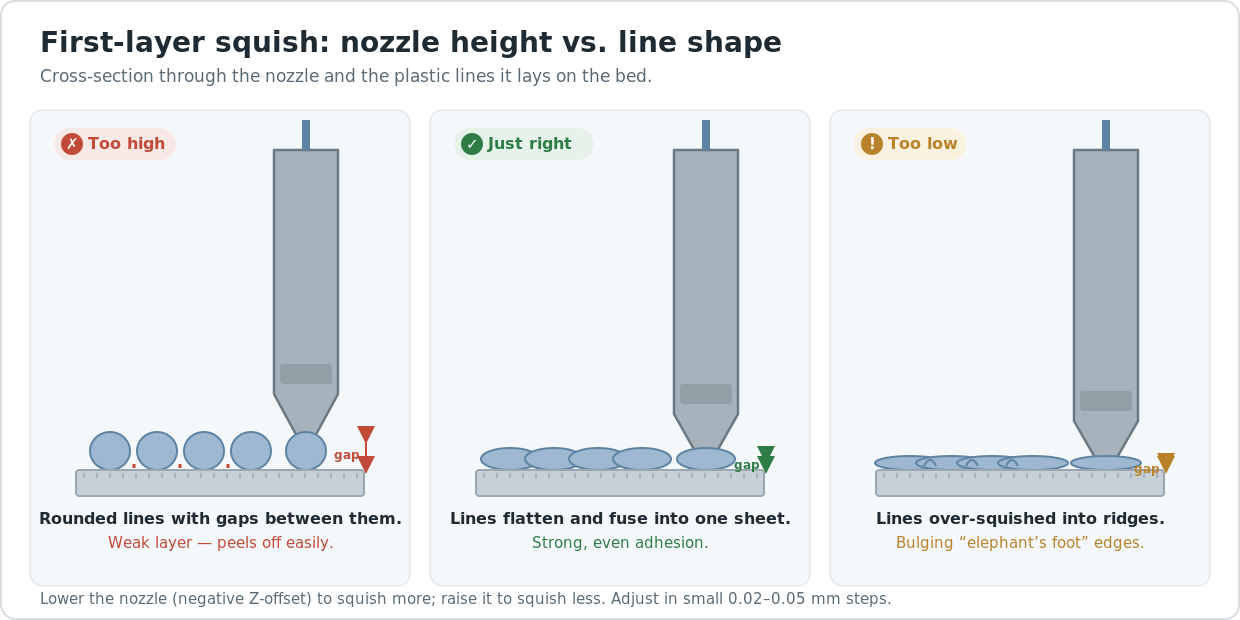
This is the fix that confuses beginners most. If the nozzle sits too high, the filament lays down as round, separated strings that peel up instantly. Too low and it drags, leaving gaps. You want the lines flattened together with no visible gap between them — the left example below. Lower the Z-offset in small steps (0.02–0.05 mm) while printing a first-layer test, and watch the lines fuse. On most printers you can live-tune this from the screen during the first layer.
Step 3: Re-level the bed (or trust auto-leveling, but verify it)
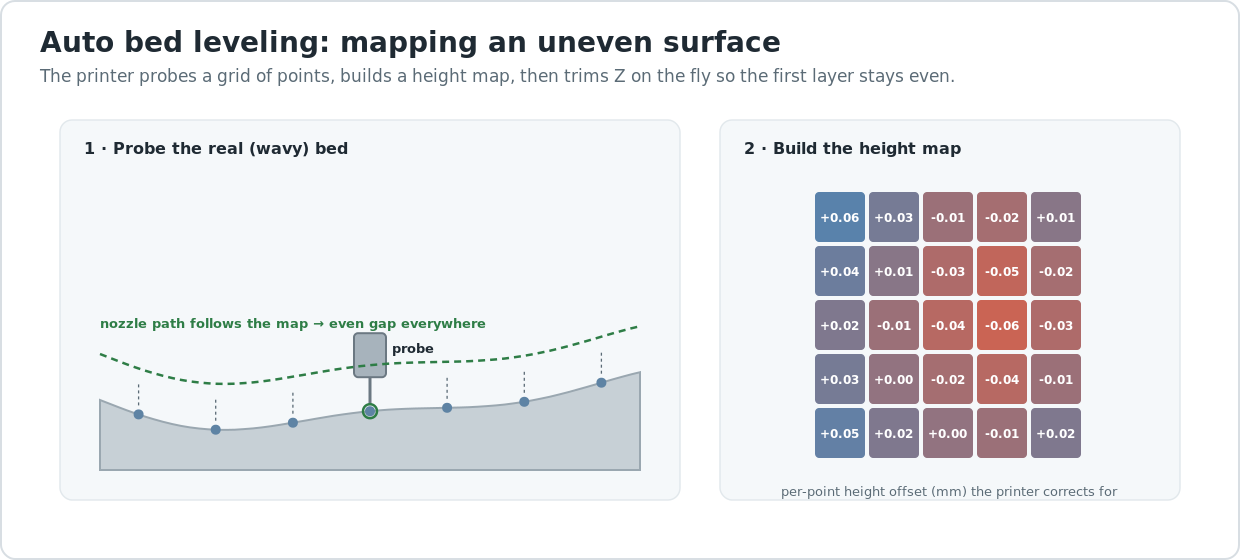
An unlevel bed means one corner gets a perfect first layer while the opposite corner floats. If your printer has manual knobs, do the paper-drag test at all four corners and the center until the resistance feels equal. If it has auto bed leveling, that probe builds a mesh of the bed's high and low spots and compensates for them on the fly — but a warped or dirty probe target will still produce a bad mesh, so re-run the calibration after any nozzle change.
Step 4: Raise the bed temperature 5–10°C
If the bed is clean, level, and the Z-offset is dialed in but parts still lift at the corners, the bed is running cold for your filament. Bump it up in 5°C steps. PLA sticks reliably at 55–65°C on PEI; PETG wants 70–80°C; ABS needs 90–110°C and ideally an enclosure. Hotter is not always better — too hot and PLA turns gummy and the first layer smears — so raise it only until lifting stops, then leave it.
Step 5: Slow the first layer down
A fast first layer doesn't give the plastic time to bond to the plate before the next line lands. Drop the first-layer speed to 20–25 mm/s in your slicer (this is a separate setting from your print speed) and the first layer to 100–120% flow. This costs you a minute or two on layer one and nothing after that. It's the cheapest insurance against intermittent adhesion failures on tall prints, where one lifted corner ruins hours of work.
Frequently asked questions
- Why won't my 3D print stick to the bed even after leveling?
- A level bed only matters if the bed is clean and the Z-offset is right. The most common miss after leveling is skin oil — wipe the plate with isopropyl alcohol. If it still lifts, the nozzle is sitting too high; lower the Z-offset until the first-layer lines flatten and fuse together with no gaps.
- Do I need glue stick or hairspray on the bed?
- Not for PLA on a clean PEI sheet — that should grip on its own. Glue stick earns its place with PETG (where it doubles as a release agent so PETG doesn't fuse to and tear the sheet) and with large ABS or PC prints. Treat adhesion sprays as a last resort once temperature and Z-offset are correct, not a first fix.
- What temperature should my bed be for the first layer?
- For PLA, 55–65°C; PETG, 70–80°C; ABS, 90–110°C with an enclosure. Start at the low end of the range and raise it 5°C at a time only if corners lift. Running the bed too hot makes PLA gummy and can cause the first layer to smear or "elephant's foot," so more heat is not automatically better.
- Should I use a brim or a raft for adhesion?
- Use a brim — a few extra outlines around the part that add grip area and peel off cleanly. A raft wastes filament, prints slowly, and leaves a rough bottom surface; reserve it for tiny parts with almost no footprint or for badly warped beds you can't otherwise fix. A 5–8 mm brim solves most corner-lift on larger prints.
The order matters more than the fix
Every “my print won’t stick” thread online jumps straight to buying a new build plate or cranking the temperature. Skip that. The failures I see most often are solved in the first two steps — a clean bed and a correct Z-offset — and both are free. Hardware is the last resort, not the first.
Work down the list in order. After each change, run a quick first-layer test (a single large flat square is enough) before moving to the next fix. Change one variable at a time, or you’ll never know which one actually worked.
If you’ve worked the whole list and the first layer still fails on every print, the machine itself may be the bottleneck — a warped bed or an inconsistent hot end will lose this battle no matter how clean your plate is. Our honest desktop 3D printer buyer’s guide covers which machines get the first layer right out of the box.
When it’s the filament, not the printer
If adhesion suddenly got worse on a roll that used to print fine, check for moisture. Filament that’s absorbed water from the air extrudes with tiny pops and a rough, inconsistent first layer that won’t bond evenly. Dry it (a filament dryer or a few hours in an oven at 45–50°C for PLA) and the problem often disappears on its own — no bed changes needed. Wet filament is also the hidden cause behind a lot of stringing, so if your prints sprout fine hairs between parts, drying the spool fixes both at once.
Last updated
Reviewed 2026-06-23. First-layer behavior is consistent across the current FDM machines we cover; temperature ranges above are starting points — your filament’s spool label always wins if it disagrees.