Why Is My 3D Print Warping? The Real Fixes, in Order
Warping is thermal contraction, not bad luck. Here's how to stop corners lifting — cheapest fixes first, enclosure last.
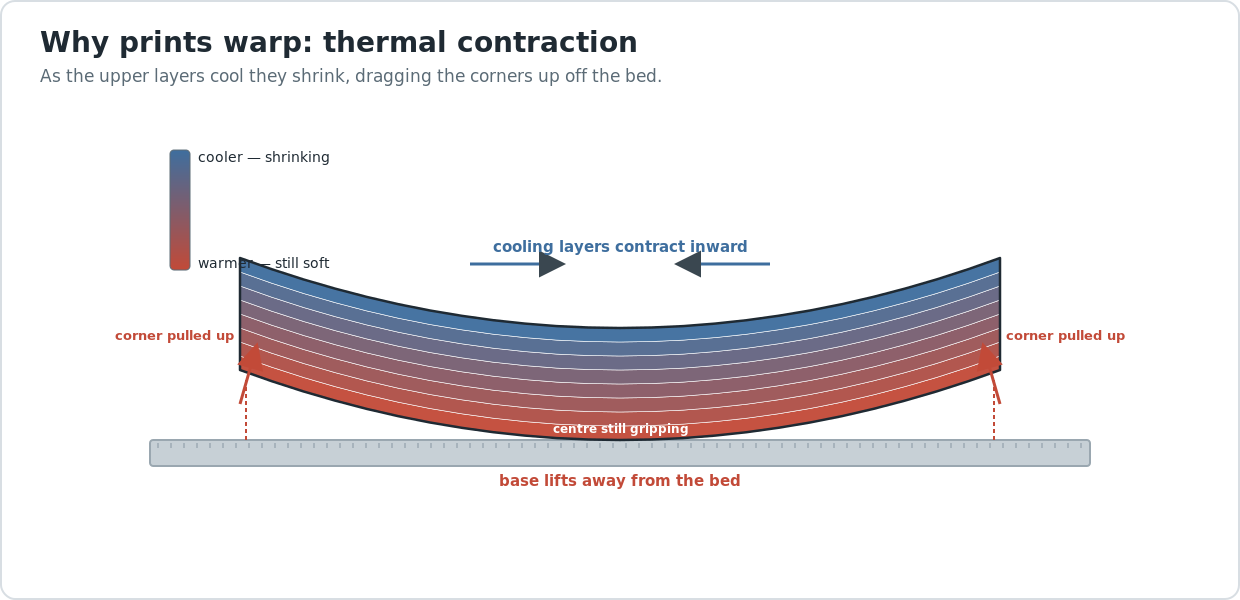
Try these in order (cheapest first)
- Make sure the first layer is actually gripping — Free
- Raise the bed temperature 5–10°C — Free
- Kill drafts — close windows, doors, and AC vents near the printer — Free
- Turn the part-cooling fan down (or off for the first layers) — Free
- Add a brim for more bed contact — Free
- Switch to a lower-warp filament if the part allows — Free
- Enclose the printer to trap ambient heat — $0 (cardboard) – $200
Step by step
Step 1: First, rule out a weak first layer
Warping and a failed first layer look different but share a root cause — not enough grip to resist the contraction forces. Before you change anything else, confirm the first layer is clean, squished, and level. A corner that never bonded properly will lift the instant the upper layers start cooling. Most "warping" on PLA is really an adhesion problem wearing a costume, so work that list first and come back here only if the first layer is genuinely solid.
Step 2: Raise the bed temperature 5–10°C
A hotter bed keeps the lower layers soft and stuck for longer, so they resist being pulled up as the top cools. Bump the bed in 5°C steps. PLA holds at 55–65°C and rarely warps; PETG wants 70–80°C; ABS and ASA need 100–110°C to stand a chance. Give the bed a few extra minutes to fully soak before the print starts — the thermistor reads temperature before the glass or PEI has actually caught up.
Step 3: Get rid of drafts
A cold draft hitting one side of the print cools it unevenly, and uneven cooling is exactly what warps a part. An open window, a door that swings past the printer, or an air-conditioning vent overhead will all do it. Move the printer out of the airflow, or just shut the door and turn off the AC for the print. This is the single most overlooked fix for ABS — people blame the filament when the real culprit is a vent two feet away.
Step 4: Turn the part-cooling fan down
The part-cooling fan is there to make overhangs and bridges crisp, but on warp-prone materials it freezes the upper layers fast and makes them contract harder. PLA can run the fan at 100%. For PETG, drop it to 30–50%. For ABS and ASA, keep it off for the first several layers and at 0–20% after — the slower everything cools, the less it pulls. This costs nothing and is the fastest thing to try after temperature.
Step 5: Add a brim
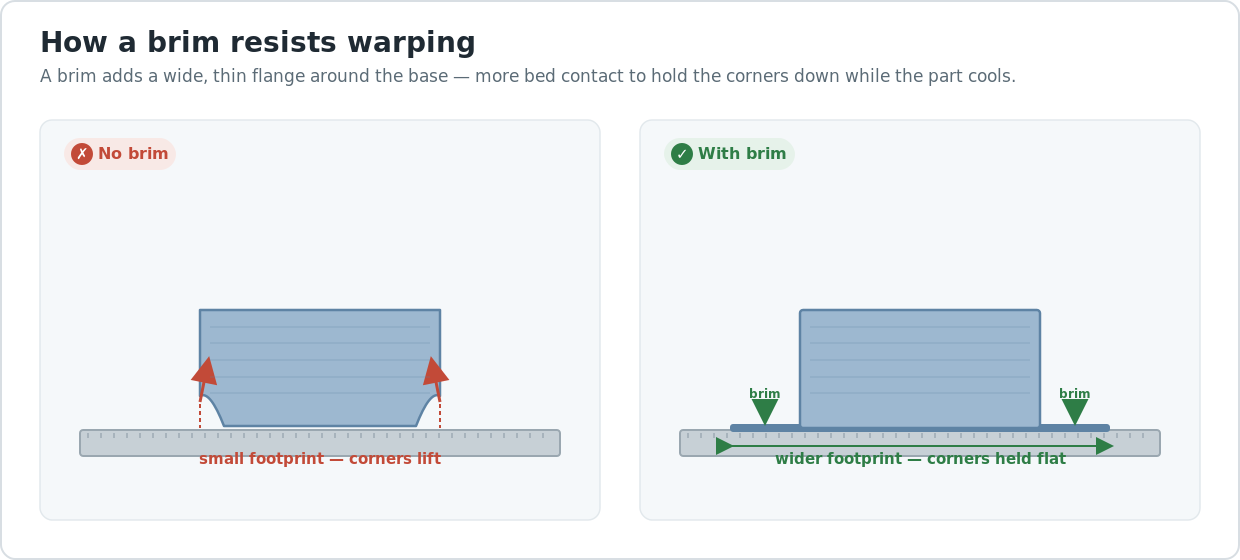
A brim is a wide, thin flange printed around the base of your part — extra bed contact that physically holds the corners down while the upper layers cool. It's the single most effective free fix for corner lift. Set it to 5–8 mm wide (roughly 8–10 outlines) in your slicer. It peels off cleanly after the print and leaves only a faint edge you can scrape or sand. Use a brim before you reach for a raft, which wastes filament and leaves a rough underside.
Step 6: Match the material to what you can control
Warping is built into the filament. PLA shrinks the least and warps the least — if the part doesn't need heat resistance, switching to PLA makes the problem disappear. PETG is a middle ground. ABS, ASA, and nylon contract the most and will keep warping no matter how clean your first layer is unless you also control the air around the print. If you're fighting a warp on ABS with an open-frame printer, you're fighting physics — move to step seven.
Step 7: Enclose the printer for high-temp filaments
An enclosure traps the printer's own heat so the whole part cools slowly and evenly — the only reliable fix for ABS, ASA, and polycarbonate on a large footprint. You don't have to buy one to test the theory: a cardboard box over the printer (keep it clear of the hot end and any belts) will noticeably reduce warp on the next print. If that confirms the diagnosis, a proper enclosure or a tent-style cover is the upgrade. Never enclose a PLA print on an open-frame machine the same way — PLA needs the cooling, and trapped heat causes its own problems like clogs and sagging overhangs.
Frequently asked questions
- Why does only one corner of my print warp?
- Uneven cooling. A draft from a window, door, or AC vent hits one side of the part and cools it faster than the rest, so that corner contracts and lifts first. It can also be a low spot in the bed or weaker adhesion on that corner. Move the printer out of the airflow and re-check that the first layer grips evenly across the whole plate.
- Does PLA warp, or is it just ABS?
- PLA warps far less than ABS because it shrinks less as it cools, but it still warps on large flat parts, with a cold bed, or in a strong draft. If PLA is lifting, the cause is almost always a weak first layer or a too-cool bed rather than the material itself. ABS, ASA, and nylon warp aggressively and usually need an enclosure to print flat.
- Will a brim stop warping completely?
- A brim stops most corner lift on PLA and PETG and helps a lot with ABS, but it treats the symptom, not the cause. If the part is warping because the air around it is cold, a brim can tear away mid-print as the contraction force builds. Fix the temperature and drafts first; use the brim as added insurance, not as the only fix.
- Do I need an enclosure to print ABS without warping?
- For anything larger than a few centimeters, effectively yes. ABS and ASA contract so much that an open-frame printer in normal room air will warp most parts no matter how hot the bed is. A cardboard box over the printer is a free way to confirm an enclosure will solve it before you buy or build one. PLA does not need an enclosure and prints worse inside one.
Warping is contraction, not bad adhesion
Plastic shrinks as it cools. In a tall print the upper layers cool and contract while the base is still warm and stuck — and that mismatch is what levers the corners up off the bed. The hero diagram above shows it: the cooling top wants to pull inward, the gripping base can’t follow, and the corners give first.
That’s why the fixes below are about slowing and evening out the cooling, not about gluing harder. A clean first layer matters — if yours isn’t gripping in the first place, start with fixing first-layer adhesion in order, because a corner that never bonded will lift the moment the top cools. Once the first layer is solid, every remaining fix here is some version of “keep the part warm and let it cool gently.” Work down the list in order and change one thing at a time, or you won’t know which fix actually worked. Different symptom but the same discipline applies if your nozzle is also leaving fine hairs between parts — that’s stringing, with its own cheapest-first fix list. And if it’s the overhangs that sag or droop rather than the base lifting, that’s a support question, not a warping one — see when and how to use supports.
When to stop fighting it and change material
If you’ve raised the bed, killed the drafts, dropped the fan, and added a brim and a 200 mm ABS part still curls, the honest answer is that an open-frame printer in room air is the wrong tool for that filament. Either enclose the printer or switch the part to PLA or PETG, which forgive far more.
This is also a buying signal. Some machines ship enclosed or run a heated chamber, and they print ABS and ASA flat with almost none of this fuss. If you find yourself fighting warp on every functional part, our honest desktop 3D printer buyer’s guide covers which machines handle high-temp filaments without a science project.
Last updated
Reviewed 2026-06-23. Bed-temperature and fan ranges above are starting points across the current FDM machines we cover — your filament’s spool label always wins if it disagrees. Enclosure-specific recommendations and a dedicated enclosure guide are in progress and will be linked here when they publish.