3D Print Supports: When and How to Use Them
Supports prop up overhangs that would otherwise sag into thin air. Here's the 45° rule for when you actually need them, which type to pick, and the settings that decide whether they snap off clean or weld to your part.
Try these in order (cheapest first)
- Check the overhang angle — under ~45° usually needs no support — Free
- Reorient the model to avoid supports entirely — Free
- Turn on supports only where the slicer flags overhangs — Free
- Pick the support type — normal (grid) or tree — Free
- Set the support Z-distance to about one layer height — Free
- Drop support density to 10–20% and add interface/roof layers — Free
- Tune overhang cooling and bridge settings so you need less support — Free–$25
Step by step
Step 1: Find out whether you actually need supports
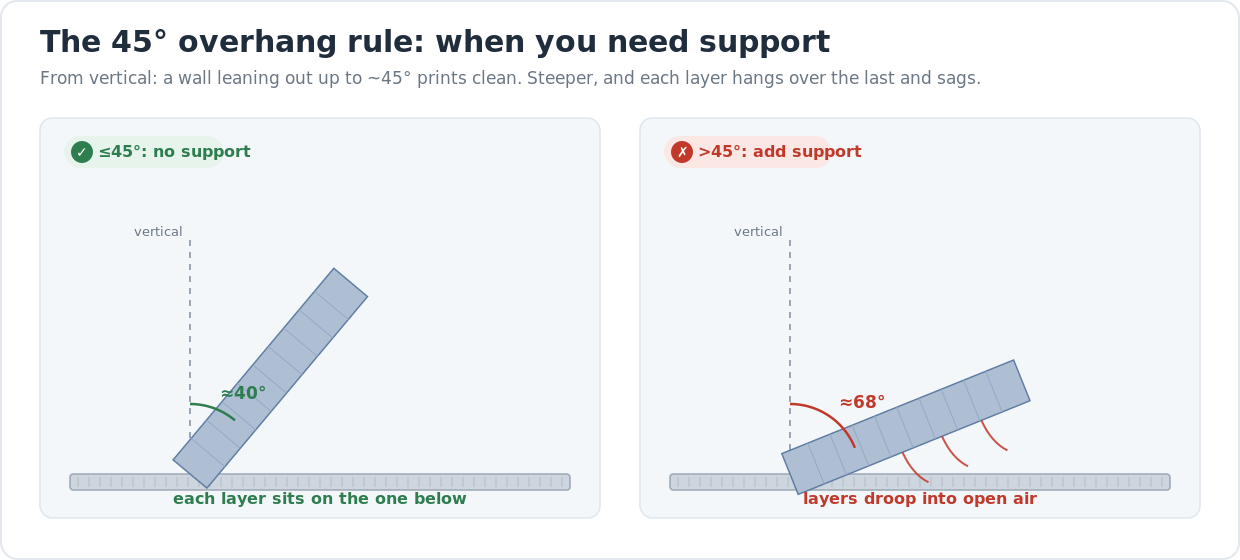
Before adding anything, look at the overhang angle. Measured from vertical, a wall that leans out up to about 45° prints fine on its own — each new layer still rests mostly on the one below. Steeper than that and the layer hangs out into open air, droops, and curls. Your slicer can show you exactly where: turn on the overhang or support preview and it highlights the at-risk faces in red. The 45° figure is a rule of thumb, not a law — a well-tuned printer with good part cooling often holds 50–55°, and a calibrated overhang test print tells you your machine's real limit in twenty minutes. Short horizontal gaps don't need columns of support either; they bridge, which is a separate trick covered below.
Step 2: Reorient the model before you reach for supports
The fastest support is no support. Rotating the model in the slicer often turns a steep overhang into a printable angle or moves it to where it doesn't matter. Lay a tall figurine on its back, stand a bracket on end, or flip a logo so the lettering faces up — the same part can go from "needs a forest of supports" to "prints clean" with one rotation. The trade-offs are layer-line direction (which affects strength and which face looks best) and bed contact. Spend two minutes spinning the model and checking the overhang preview before you accept supports; you'll save filament, print time, and a sanding session.
Step 3: Add supports only where the overhangs are
When you do need them, don't blanket the whole model. Most slicers offer "support on build plate only," which skips any support that would have to grow off the part itself — that avoids scarring visible surfaces and saves material. For the leftover spots, paint them on by hand: Bambu Studio and PrusaSlicer let you brush support exactly where it's needed and block it everywhere else (Cura uses support blockers for the same job). The goal is the minimum scaffolding that holds the overhang, not a solid block under the entire part.
Step 4: Choose normal (grid) or tree supports
Normal supports — grids or lines — fill the whole footprint under an overhang. They're sturdy and reliable for flat, wide overhangs, but they use more plastic and can be a pain to dig out of tight spaces. Tree supports (called organic supports in PrusaSlicer 2.6 and later) grow a trunk from the bed and branch up to just the contact points. They use far less material, print faster, and peel off cleanly — ideal for figurines, miniatures, and organic shapes. The catch: tree supports are weaker under broad flat overhangs and can tip on very tall models, so reach for normal grids when the overhang is large and flat, tree when it's sparse or curvy.
Step 5: Set the Z-distance — the setting that decides removal
Support Z-distance (also called support top distance) is the vertical gap between the top of the support and the underside of your part. Get it wrong and nothing else matters. Too small and the support fuses to the part, scarring the surface and forcing you to gouge it off. Too large and the overhang sags because there's nothing close enough to hold it. Aim for about one layer height — 0.1 mm at a 0.1 mm layer, 0.2 mm at a 0.2 mm layer. PLA releases easily at the low end; PETG and TPU stick hard, so bump the gap a notch or print interface a touch cooler. Dial this in once per material and supports go from dreaded to trivial.
Step 6: Drop the density and add an interface layer
Support density controls how much plastic fills the support structure. You rarely need more than 10–20% — the support only has to hold the overhang, not carry weight. Lower density means less plastic, faster prints, and easier removal. The trade-off is the support surface: sparse supports leave a rougher underside on the overhang. Fix that with support interface (roof) layers — a few dense layers right at the top of the support that give the overhang a smooth base to print onto, while the bulk underneath stays sparse. A small interface Z-gap or X/Y gap keeps even that dense cap from welding on.
Step 7: Cool and slow the overhangs so you need less support
Half of "needs support" is really "the overhang never got a chance to set." Good part cooling freezes each layer before the next lands, so shallow overhangs and short bridges hold without scaffolding. Make sure your part-cooling fan runs at full on overhang-heavy prints (PLA loves it; ABS and ASA want less to avoid warping), and slow the overhang and bridging speeds in the slicer so the plastic has time to solidify mid-air. A reliable bridge can span a surprisingly wide gap with zero support underneath. If overhang surfaces still look stringy and rough rather than sagging, that's usually an oozing problem — fix the stringing before you blame the supports.
Frequently asked questions
- At what angle do you need supports on a 3D print?
- Roughly anything steeper than 45° measured from vertical. Up to about 45°, each layer still rests on the one below and prints clean; past that the overhang hangs into open air and sags. The exact limit depends on your printer and cooling — a well-tuned machine often holds 50–55°. Run an overhang test print to find yours.
- Are tree supports better than normal supports?
- For organic shapes, figurines, and sparse overhangs, yes — tree supports use less plastic, print faster, and peel off cleaner. For wide, flat overhangs they're worse, because the branches can't hold a broad surface evenly and tall trees can tip. Use normal grid supports under large flat overhangs and tree supports everywhere curvy. It's geometry, not one being universally best.
- What support Z-distance should I use?
- About one layer height — 0.1 mm gap at a 0.1 mm layer height, 0.2 mm at a 0.2 mm layer. That's small enough to hold the overhang but large enough for the support to snap off. PLA releases at the low end; stickier materials like PETG and TPU want a slightly bigger gap. It's the single most important support setting for clean removal.
- Why won't my supports come off, or why do they leave marks?
- Almost always the Z-distance is too small, so the support has fused to the part. Increase the support top distance toward one full layer height and reprint. Material matters too — PETG and TPU bond to supports far more than PLA, so they need a larger gap. Lower support density and a small interface gap also help the support release and leave a cleaner surface.
- Do supports waste a lot of filament?
- They can, which is why you minimise them. Reorient the model to avoid overhangs, use "support on build plate only," paint supports just where they're needed, and keep density at 10–20%. Tree supports use noticeably less plastic than grids. Done right, support is a small fraction of the print rather than a solid block you throw away.
- Can I print overhangs without any supports?
- Often, yes. Overhangs up to about 45° self-support, and short horizontal gaps bridge across without anything underneath if your part cooling is good and you slow the bridge speed. Strong cooling, a reorientation, and chamfering sharp overhangs into gentler slopes can eliminate supports on many prints. Supports are the fallback, not the default.
Supports are scaffolding, not a setting you leave on
A 3D printer lays plastic one layer on top of the last, and each layer needs something underneath to land on. When a surface overhangs too far — a steep wall, an outstretched arm, a flat roof — there’s nothing below it but air, so the plastic droops and curls. Supports are temporary scaffolding the slicer builds under those spots, then you snap them off after printing.
The trap is treating “enable supports” as a default. Supports cost filament, print time, and a cleanup session, and they leave marks on the surface they touched. The skill isn’t turning them on — it’s needing as few as possible, putting them only where overhangs actually exist, and tuning them so they peel off clean. Work the list above in order: decide whether you need them at all, then which kind, then the two settings (Z-distance and density) that make or break removal.
How tree supports differ from normal grids
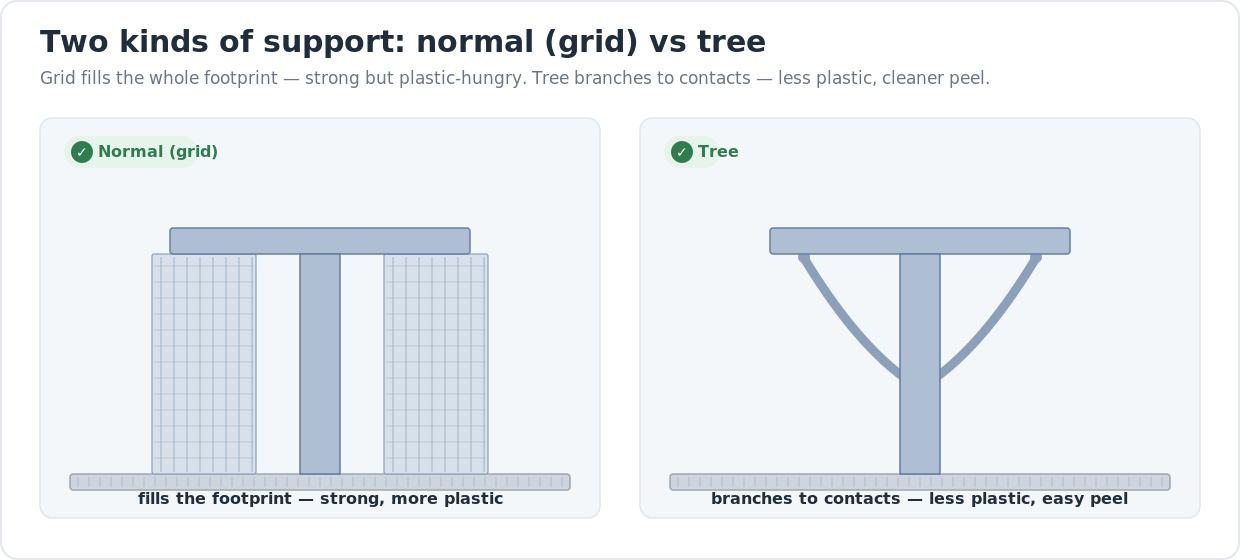
Normal supports fill the space under an overhang with a vertical grid — strong and predictable, but plastic-hungry and fiddly to remove from enclosed areas. Tree supports branch up from a trunk to touch only where the overhang needs holding, so they use less material and tend to snap off in one piece. Pick grids for broad flat overhangs where a tree can’t spread its load evenly; pick tree for figurines, busts, and anything organic. Most modern slicers — Cura, PrusaSlicer (where they’re called organic supports), and Bambu Studio — offer both, so it’s a per-model choice, not a printer limitation.
The one setting that decides whether removal is easy
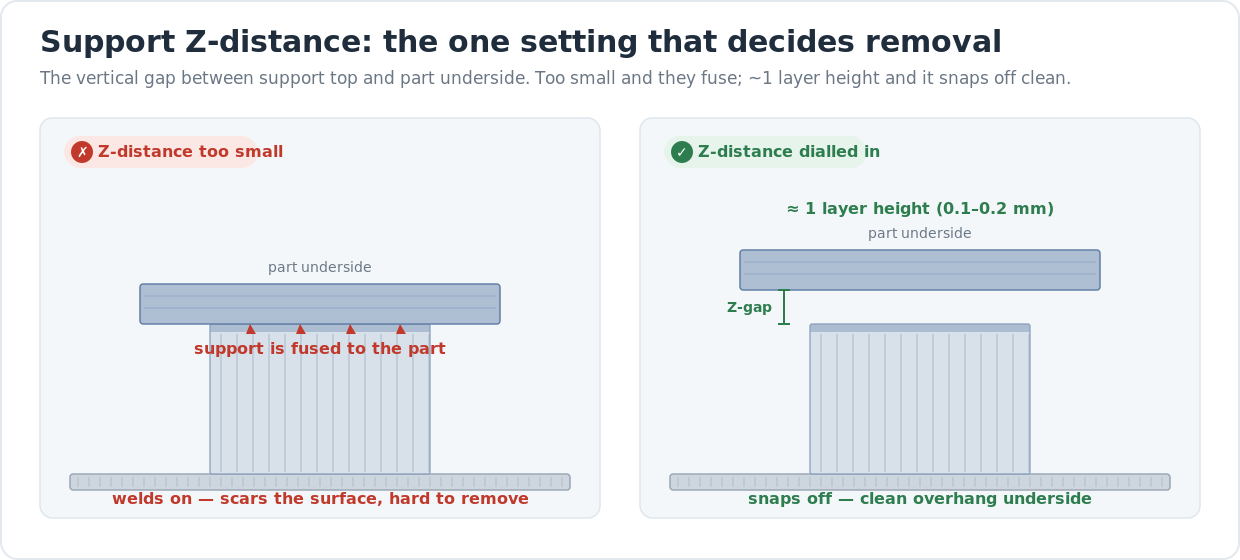
If you change one thing, change the Z-distance. It’s the gap between the top of the support and the underside of your part, and it’s the difference between scaffolding that lifts off with your fingernail and scaffolding you have to dig out with pliers. About one layer height is the sweet spot for most materials. Too tight and the support welds to the part; too loose and the overhang sags because nothing’s holding it close enough. Dial it in once per filament and save it to a profile — settings like this are per-material, not per-printer.
Materials that hold heat and stick — PETG, TPU, nylon — fuse to supports far more than PLA, so they want a slightly larger gap and gentler interface settings. If your overhangs come out rough or stringy rather than sagging, that’s usually ooze on travel moves, not a support problem; sort out stringing first. And if the whole print is lifting at the corners while you fight overhangs, fix the warping before you trust anything the supports tell you.
When supports are really a printer problem
Most overhang failures are settings, not hardware — but not all. A printer with weak or poorly ducted part cooling will sag on overhangs that a better-cooled machine handles bare, which means more support, more cleanup, and rougher results on every print. Strong, well-aimed cooling and a well-tuned stock profile genuinely reduce how much support you need. If you’re shopping and tired of babysitting supports, our honest desktop 3D printer buyer’s guide covers which machines print clean overhangs out of the box.
Last updated
Reviewed 2026-06-24. The 45° rule, Z-distance (~1 layer height), and 10–20% density figures above are starting points across the current FDM machines and slicers we cover — your material’s behaviour and your slicer’s defaults always win if they disagree. Run an overhang test print to find your own printer’s true unsupported limit.