Why Is My 3D Print Shifting Layers? Cheapest Fixes First
A layer shift means the print head lost its position mid-print. Here's how to stop it — clear collisions and tighten belts first, before you touch the stepper drivers.
Try these in order (cheapest first)
- Clear any collision — a lifted corner, a blob, or a snagged cable — Free
- Check and tighten the X and Y belt tension — Free
- Lock the pulley grub screws on the motor shafts — Free
- Slow the print down — drop speed and acceleration — Free
- Lubricate the rods and rails and check for binding — Free–$10
- Cool the stepper drivers or raise their current (VREF) — Free–$15
Step by step
Step 1: Rule out a collision first
Most sudden, one-time shifts aren't a settings problem — the nozzle hit something and skipped. A warped corner that curls up into the path, a blob of stray plastic, or a print that came loose and got dragged will all knock the head off position in an instant. Look at the print: if the shift happened once at a specific height, suspect a collision at that layer. Fix the root cause — sort out warping and first-layer adhesion so nothing lifts into the nozzle's path — and also check that no cable or clip can snag the gantry as it moves.
Step 2: Check the X and Y belt tension
A loose belt is the most common repeat offender. When the belt is slack it skips teeth on the pulley under hard direction changes, and every skipped tooth is a few lost millimetres that never come back. Pluck each belt like a guitar string — it should give a low, firm note, not a dull flap. If it sags, find the tensioner (most printers have a thumbscrew on the X and Y ends) and take up the slack until the belt is taut but not banjo-tight. Over-tightening strains the motor bearings, so stop at firm.
Step 3: Lock the pulley grub screws
Each belt loops around a toothed pulley clamped to a stepper-motor shaft by one or two tiny grub (set) screws. If a grub screw backs off, the pulley spins freely on the shaft and the motor turns while the belt doesn't — a shift with no obvious cause. Find the X and Y motor pulleys, rotate each until a grub screw faces you, and check it with the right hex key. One screw should sit on the flat of the shaft. Nip them snug; a drop of removable thread-locker stops them wandering again.
Step 4: Slow the print down
Speed and acceleration are the settings that cause shifts. The faster the head whips around, the more force it takes to start and stop it, and past a point the motor can't keep up and loses steps. If shifts started after you pushed for faster prints, that's the cause. In your slicer, drop the print speed by 20–30% and lower the acceleration and jerk (or "junction deviation") values. Reprint. If the shift is gone, raise the numbers gradually until it returns, then back off — you've found your machine's real ceiling.
Step 5: Lubricate the rods and check for binding
If the axes don't glide freely, the motor fights friction and can stall mid-move. With the printer off, push the gantry and bed slowly by hand through their full travel. They should slide smoothly with no stiff spots, grinding, or catches. A stiff patch means a dry or dirty linear rod, a misaligned rail, or an eccentric nut that's clamped a wheel too tight. Wipe the rods clean and add a thin film of light machine oil or PTFE grease — never WD-40, which dries sticky. Loosen any wheel that won't roll, then retest by hand.
Step 6: Suspect the stepper drivers last
If belts are tight, pulleys are locked, the axes glide, and the print is slow but it still shifts — usually always on the same axis — the stepper driver is the likely culprit. Drivers that overheat throttle back and drop steps, so make sure the board's fan runs and the case has airflow; a shift that appears only deep into long prints points straight at heat. On boards with adjustable drivers, the current (VREF) may be set too low to hold the motor under load. Raising it is a careful, board-specific job — check your printer's documentation before turning the pot.
Frequently asked questions
- What is the difference between a layer shift and warping?
- They look similar but come from opposite ends of the machine. A layer shift is a sideways jump — the whole print above a certain height is offset because the head lost its position, so the walls have a clean step in them. Warping is the plastic itself contracting and curling up off the bed, usually at the corners, while the head stays perfectly on track. If the step is sharp and sideways, it's a shift; if the corners are lifting and rounding, it's warping.
- Why does my print only shift on one axis?
- Because each axis has its own belt, pulley, and motor, and a fault in one shows up only in that direction. A shift that's always left-right points at the X belt, pulley, or driver; one that's always front-to-back points at Y. That's actually useful — it tells you exactly which belt to tension and which grub screw to check. Shifts that wander in random directions are more likely collisions or an overheating board affecting both drivers.
- Can printing too fast really cause layer shifts?
- Yes — speed and acceleration are among the most common causes. When the head changes direction faster than the motor can deliver torque, the motor skips steps and the print offsets. If your shifts started after you turned up the speed or installed a "fast" profile, drop the speed and acceleration by 20–30% and reprint. Find the point where shifts stop, then raise the numbers until they return and back off. Every machine has a real-world ceiling below its marketing number.
- How tight should the belts be?
- Firm, not drum-tight. Pluck the belt and listen for a low, clear note rather than a dull flap — that's the target. A belt you can twist 90 degrees with light finger pressure is roughly right on most desktop printers. Too loose and it skips teeth and shifts; too tight and it loads the motor bearings and can cause its own missed steps over time. Tension the X and Y belts equally and recheck after a few prints, since new belts settle.
- My print shifted once but the rest printed fine. Is something broken?
- Probably not. A single shift at one height is almost always a one-off collision — the nozzle clipped a warped corner, a blob, or a piece that came loose — rather than a failing part. Clear whatever was in the path, make sure your first layer and adhesion are solid so nothing lifts, and reprint. If shifts keep happening at random heights across different prints, then it's worth working through the belt, pulley, speed, and driver checks above.
A layer shift is the head losing its place
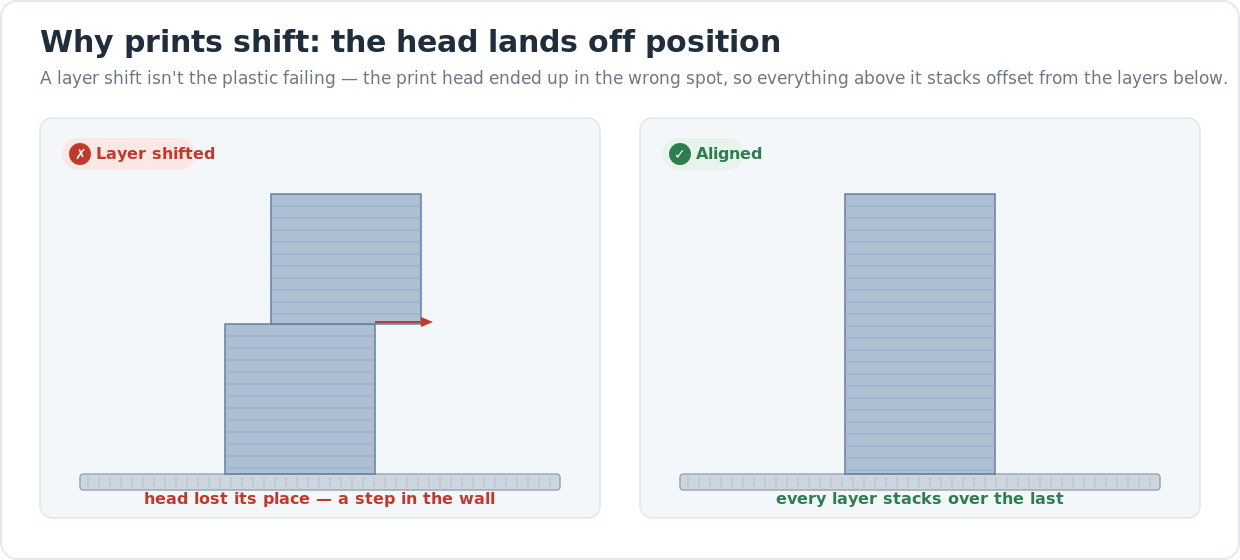
A layer shift happens when the print head ends up in the wrong spot partway through a print, so every layer after that point stacks offset from the ones below. The hero diagram above shows it: on the left the upper block has jumped sideways, leaving a hard step in the wall; on the right every layer lands directly over the last. The plastic is fine — the machine simply lost track of where it was.
That points the fixes in a clear direction. Either something physically knocked the head off course (a collision), or the motion system let the motor turn without the head following (a loose belt or pulley), or you asked the head to move faster than the motor could deliver (speed and acceleration). Work the list in order and change one thing at a time, or you won’t know which fix actually worked. If your corners are also lifting off the bed, fix warping first — a curled corner is the single most common thing the nozzle collides with.
Why a loose belt makes the head skip
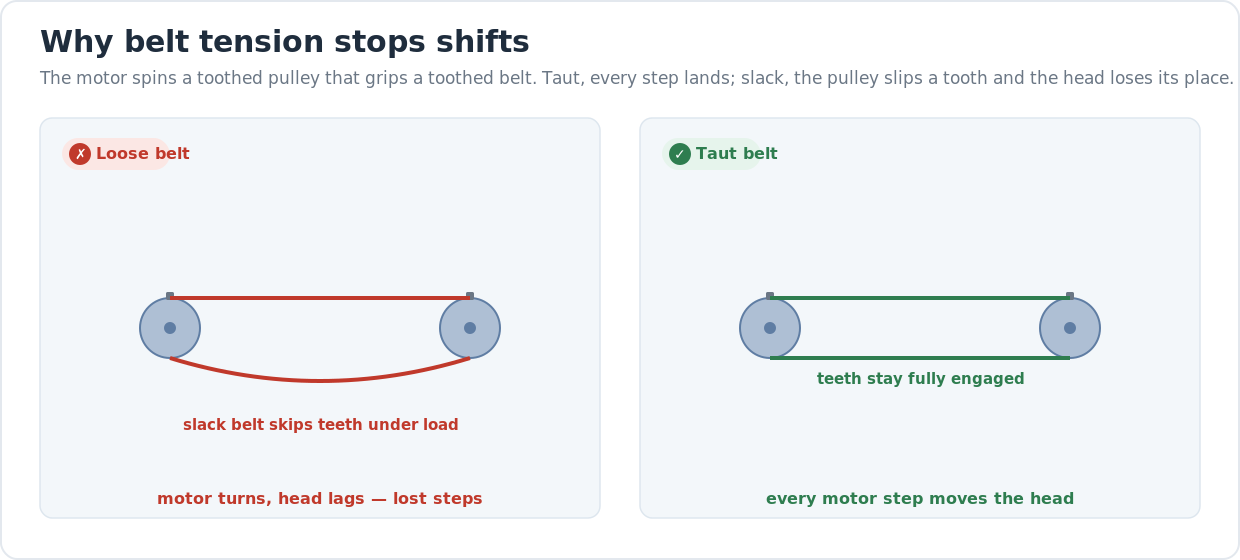
The motor doesn’t move the head directly — it spins a toothed pulley that grips a toothed belt. When the belt is taut, every tooth on the pulley locks into the belt and every step the motor takes moves the head an exact distance. When the belt sags, the teeth ride loose, and under a hard direction change the pulley can slip a tooth or two while the head lags behind. Those skipped teeth are lost millimetres that never come back, and the rest of the print stacks on top of the error. Tension the belt and lock the pulley to its shaft, and that whole failure mode disappears.
When it’s worth fixing versus buying past it
A single shift is almost always a one-off collision and not worth losing sleep over. Repeated shifts on the same axis mean a real mechanical issue you can fix for free with a hex key and ten minutes. Where it gets frustrating is on bargain machines with stamped brackets and undersized motors that lose steps the moment you print at any real speed — no amount of belt tension fully solves an underpowered motion system.
If you’re tuning a machine that shifts constantly even slow and you’re wondering whether it’s you or the printer, our honest desktop 3D printer buyer’s guide covers which machines hold position at speed and which fight you on every print. And once the head tracks reliably, dialing in clean walls is mostly about retraction and temperature and a solid first layer.
Last updated
Reviewed 2026-06-23. The belt-tension, speed, and acceleration figures above are starting points across the current FDM machines we cover — your printer’s documentation always wins if it disagrees, especially for stepper-driver current (VREF), which is board-specific and easy to get wrong. A dedicated bed-leveling guide is in progress and will be linked here when it publishes.