How to Level a 3D Printer Bed (The Right Way, for Free)
Leveling sets the same tiny gap between nozzle and bed everywhere. Do it properly by hand first — most "I need a probe" problems are really a five-minute manual fix.
Try these in order (cheapest first)
- Heat the bed (and nozzle) to printing temperature before you touch anything — Free
- Home the printer and run the paper-drag method on all four corners — Free
- Set the Z-offset so the first layer is squished, not floating — Free
- Print a first-layer test and adjust live — Free
- Fix a bed that won't hold level — springs, spacers, or a warped plate — $0–$15
- Add auto bed leveling only if manual leveling keeps drifting — $15–$40
Step by step
Step 1: Heat the bed to printing temperature first
Always level a hot bed, never a cold one. Metal expands as it heats, and a plate that reads level cold can bow by a few tenths of a millimetre once it hits 60°C — enough to ruin a first layer. Set the bed to the temperature you actually print at (60°C for PLA, 70–80°C for PETG) and let the nozzle heat too, then wipe any blob of plastic off the tip with a brass brush or a folded paper towel. A stray nugget on the nozzle throws every corner off. Give the bed five minutes to settle at temperature before you start.
Step 2: Run the paper-drag method on all four corners
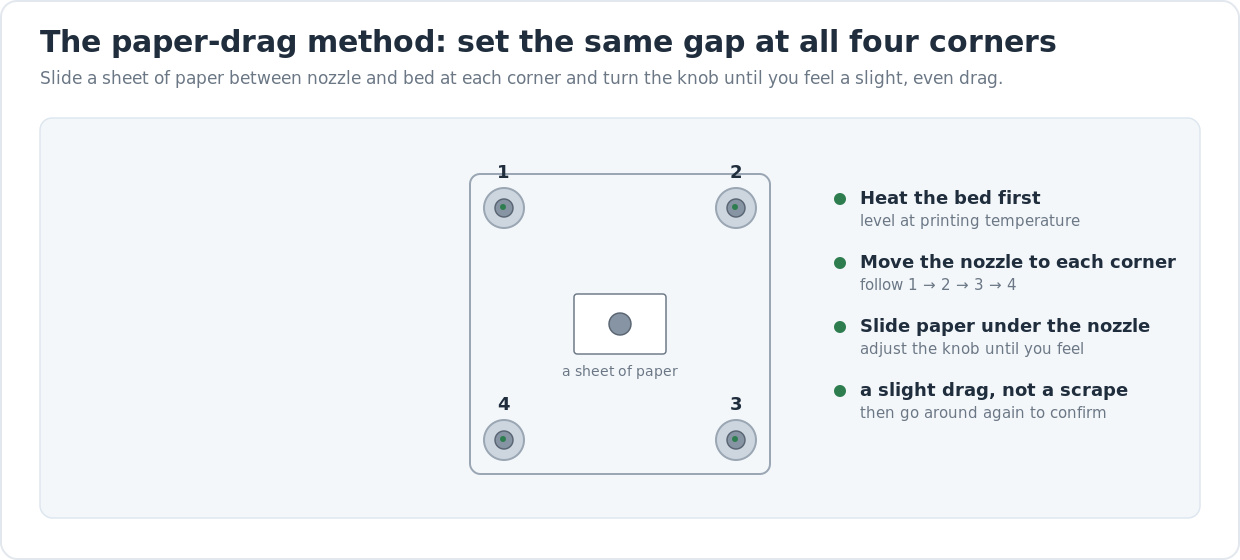
Home the printer, then disable the steppers so you can push the nozzle around by hand (or use your printer's "auto home / move to corner" menu). Slide a single sheet of printer paper between the nozzle and the bed at the first corner. Turn that corner's knob until you feel a slight, even drag on the paper — the paper should move with a little resistance, not slide free and not jam. Repeat at the other three corners. Then go around again: adjusting one corner tilts the whole bed slightly, so the second pass is what actually gets you level. A third pass confirms nothing moved.
Step 3: Set the Z-offset so the first layer squishes flat
Paper gets you close; the Z-offset gets you exact. The paper method leaves a gap roughly the thickness of the paper (about 0.1mm), but the perfect first layer is a touch tighter than that. Start a print or your printer's first-layer calibration and watch the lines go down. You want them flattened together with no gaps between them — not round, separated strings (nozzle too high) and not a translucent smear (too low). Nudge the Z-offset down in 0.02–0.05mm steps live from the screen until the lines fuse into a smooth sheet. Most printers let you save this so you only do it once per surface.
Step 4: Print a first-layer test and read it
Print a single-layer square that covers most of the bed — search your slicer or Printables for a "first layer test" or "bed level test" pattern. When it finishes, look at it under a light. A good first layer is uniform edge to edge with the lines welded together. If one corner is glossy and squished while the opposite corner is rough and stringy, that corner pair is still off — go back and re-do the paper method there. If the whole sheet is too thin or too thick evenly, that's the Z-offset, not leveling. This test tells leveling and offset problems apart in 90 seconds.
Step 5: Fix a bed that won't hold level
If you level perfectly and it drifts within a few prints, the hardware is fighting you. Weak or worn bed springs are the usual culprit — swap the stock springs for stiffer ones or silicone spacers (a few dollars) and the bed stops creeping out of level. Check that the build plate sits flat and clean; a warped plate or a crumb of plastic under the magnetic sheet creates a high spot no leveling can fix. A genuinely warped bed shows up as a centre that's high or low when the corners are perfect — confirm it by leveling the corners, then checking the middle with paper. A warped plate needs replacing, not re-leveling.
Step 6: Add auto bed leveling only if it keeps drifting
Auto bed leveling (a BLTouch, CR Touch, or an inductive probe) doesn't physically level anything — it maps the bumps in your bed and tells the printer to follow them, raising and lowering the nozzle as it prints the first layer. It's worth adding when your bed is slightly warped and won't go truly flat, when you swap surfaces constantly, or when you're just tired of the paper dance. It is not a fix for a filthy bed, a bad Z-offset, or loose springs — those still need sorting first. For a flat, well-sprung bed you level once a month, a probe is a convenience, not a requirement.
Frequently asked questions
- Should I level my 3D printer bed hot or cold?
- Always hot. Heat the bed to the temperature you print at — around 60°C for PLA — before leveling, because metal expands as it warms and a plate that's level cold can bow once it heats up. Leveling cold and then printing hot is one of the most common reasons a "perfectly leveled" bed still gives a bad first layer.
- How often do I need to level my 3D printer bed?
- On a printer with stiff springs and a flat plate, every few weeks or after you move the machine is plenty. Level more often if you change build surfaces, print very large parts, or notice the first layer drifting. If you find yourself re-leveling every print, the problem isn't the leveling — it's worn springs, a dirty plate, or a warped bed that needs fixing instead.
- What is the difference between bed leveling and Z-offset?
- Leveling makes the gap between nozzle and bed the same at every corner — it fixes a tilted bed. Z-offset sets how big that gap is overall — it fixes a first layer that's evenly too high or too low across the whole plate. You level first to get the bed flat relative to the nozzle, then set the Z-offset to dial in the squish. They're separate adjustments and you need both right.
- What thickness of paper should I use to level a bed?
- Standard printer paper, around 0.1mm thick, is the usual reference and works fine. The exact thickness matters less than getting the same drag at all four corners — leveling is about making every corner equal, not hitting a precise number. After the paper pass, fine-tune the actual gap with the Z-offset while watching the first layer go down, since paper alone leaves the nozzle slightly too high.
- Do I still need to level the bed if I have a BLTouch or auto bed leveling?
- Mostly no for the tilt, but yes for the basics. A probe maps the bed and compensates as it prints, so you don't do the paper dance — but you still set a correct Z-offset, keep the plate clean, and make sure the bed isn't grossly tilted or the probe runs out of range. Auto leveling follows a warped bed; it doesn't fix a dirty surface, a bad offset, or loose springs.
- Why is my first layer good on one side and bad on the other?
- That's the classic sign of an unlevel bed. One side has the nozzle too close (squished, glossy, scraping) while the opposite side has it too far (rough, stringy, not sticking). Re-run the paper-drag method on the corners on the bad side, then go around all four again to confirm — adjusting one corner shifts the others, so a single pass rarely holds.
Leveling means an even gap, not a perfectly flat bed
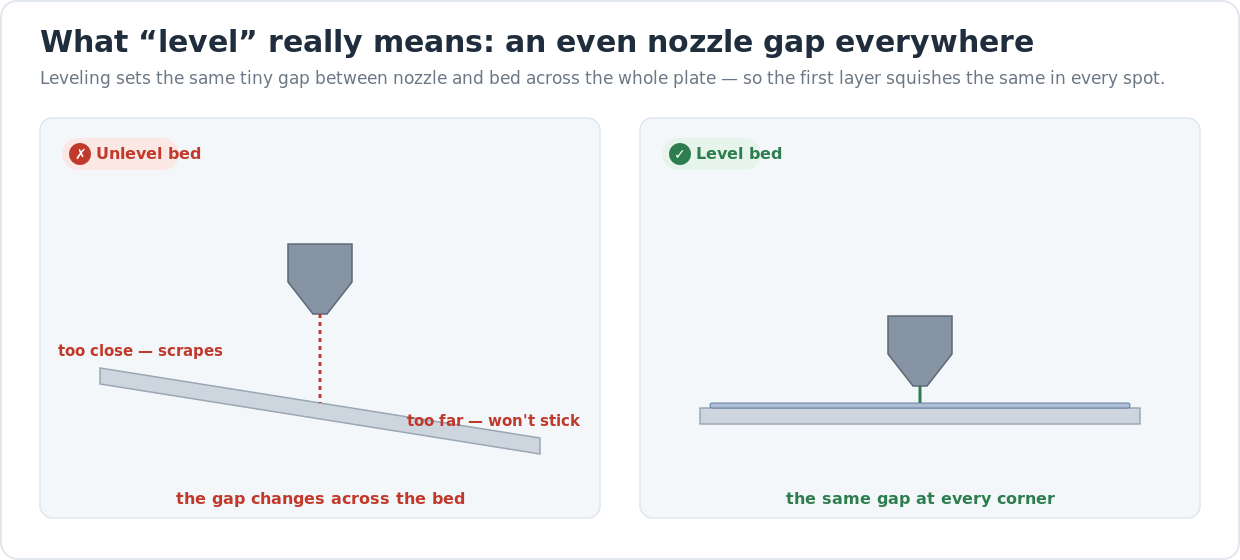
“Leveling” is a misleading word. You’re not making the bed perfectly horizontal — you’re making the nozzle keep the same tiny gap above the bed everywhere it travels. The hero diagram shows why that distinction matters: on a tilted bed the gap shrinks to nothing on one side and yawns open on the other, so the first layer scrapes on one corner and won’t stick on the opposite one. A level bed holds that gap constant, and the whole first layer squishes the same.
Get this one layer right and most beginner print failures simply vanish. The first layer is the foundation every other layer builds on — if it’s even and welded down, the print sticks; if it’s not, you get warping, lifting, and prints that pop off mid-job. Almost all of it is fixable for free in about five minutes, which is why hardware fixes come last on the list, not first.
Level first, then fix the first layer’s squish
The order matters. Leveling makes the four corners equal; the Z-offset then sets how hard that even first layer presses into the bed. People who skip straight to chasing the Z-offset on a tilted bed end up fighting a problem that moves around the plate. Do the corners first with paper, then dial the squish.
If your first layer still won’t stick once the bed is level and the offset is set, the problem has moved past geometry — it’s usually a dirty surface or the wrong temperature. Our guide to first-layer adhesion problems works through cleaning, surface choice, and adhesion helpers in cheapest-first order, and it’s the natural next read after this one.
When the bed won’t stay level
A bed that drifts out of level after one good print is a hardware problem wearing a leveling costume. Worn springs let the bed creep; a warped plate creates a high spot in the middle no corner adjustment can reach; a crumb of plastic trapped under a magnetic sheet lifts one zone. Stiffer springs or silicone spacers cost a few dollars and fix the drift for good. A genuinely warped plate needs replacing — and the same uneven heating that warps a plate also shows up in your prints, which our guide to why prints warp and lift covers in detail.
When auto bed leveling is actually worth it
A BLTouch or inductive probe is a real upgrade if your bed is slightly bowed and won’t go flat, or if you swap surfaces constantly and don’t want to re-level every time. But it maps and follows your bed — it doesn’t make a bad bed good. Clean surface, correct Z-offset, and solid springs still come first. If you’re weighing whether to add a probe or just buy a printer that levels itself, our honest desktop 3D printer buyer’s guide covers which current machines come with reliable auto leveling out of the box.
Last updated
Reviewed 2026-06-30. The temperatures and offsets above are typical starting points for common FDM printers and PLA/PETG — your printer’s documentation and your filament’s printed range win if they disagree. Manual paper leveling is the same on virtually every bed-slinger and most i3-style printers; auto-leveling menus vary by firmware, so check your machine’s guide for the exact button sequence.